|
|
|
|
|
|
|
|
|
|
|
|
|
|
|
|
|
|
The following diagram is for your personal use only. You may make a printout for yourself, if you would like to make multiple copies for use in classes please contact me for permission, do NOT make copies for inclusion in kits. I do not "own" this technique, as it is a traditional Appalachian technique that I learned from studying old baskets in my parent's collection, so please feel free to teach it to others, but I do "own" the copyright on the written descriptions and drawings seen here. I hope this eliminates any confusion over fair use of these diagrams. Thanks, |
 |
 |
 |
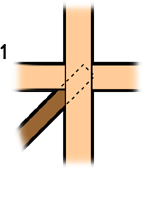
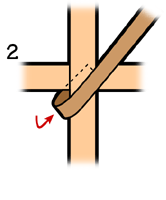
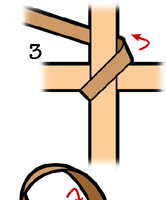
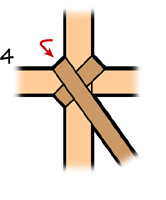
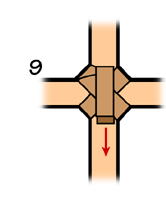
This diagram demonstrates one traditional method of lashing the rims together for a ribbed egg basket. I call this an "ear" for some reason, I really don't know where I got that term from. For most baskets 8-10 inches in diameter I use 1/2" flat reed for my lashing material. I scale the material appropriately for larger or smaller baskets. This technique is very useful on ribbed herb or key baskets where isn't a lot of room for bulky lashings like the God's eye. This is also good for using-up scrap pieces as it only take a couple of feet of reed to do each ear. To place ribs into the ear I use an awl to poke holes into the reed and insert the sharpened ribs. This method holds the ribs in place much more securely than the God's eye. I hope you enjoy this technique and are able to use it in your basket making. |
||
 |
 |
 |
 |
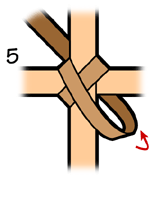 |
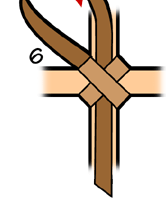 |
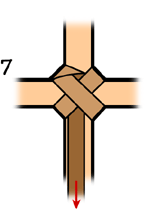 |
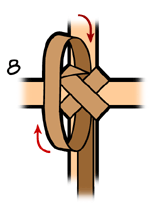 |
 |
1. Start by placing the flat reed (lasher) behind the crossed hoops (rims), rough side against the rims. |
2. Bring lasher around and across front of crossed rims. |
3. Bring lasher around behind the handle. |
4. Bring lasher down and across front of rims creating a cross. |
5. Bring lasher up and across back of rims catching your starting tail. You should now have a cross in front and in back of rims. |
6. & 7. Now here is the tricky part. Bring the lasher down behind the cross, but in front of the rims. You will have to give the lasher a half twist so that as you pull it tight the reed will lay nicely around the top of the cross. |
8. Loop the lasher back around in front of the cross and back between the rims and cross. |
9. After you have carefully pulled the lasher tight you can cut the tail off short. |
Rib Placement | |
|
|
Here is an example of the "ear" in use. I usually start out with 4 primary ribs on each side of the basket, plus an extra rib above the rim. After a few rows of weaving I will add secondary ribs as necessary. | |
|
|
|
| ||
Email Me |
See My |
Page created March 12, 2000 |